Monday, December 13, 2010

Photos Restored

Okay so here is the photo I restored. There isn't much of a difference, but I hope you like it, and find it satisfying. I don't know who these people are, but if the person who actually owns this photo, if they find it, then well I restored it for you. Your welcome. Don't worry. No favors. Just money. KIDDING! Stephen and I did the same photo, I think his is better. Just saying.


Before and After

To create this picture, I used the cloning brush and took away the white lines and yellow-ish border around the photo. Next, I changed the yellow-ish colours to white, so that the picture looked more realistic and didn't seem to be as old as it looked. To do this, I used the Enhance, Adjust Colour, Replace Colour tool, and adjusted the lighting (contrast and brightness) of the photo. Then, I used the sharpen tool to make the photo not look so blurry or fuzzy. Viola! A new photo, from the old photo.

- Gorecki.

Wednesday, November 3, 2010

Gorecki Digital Paintings

This is not my fortay. They suck I know, but I tried. I feel like I am better with photo manipulations. Here are two paintings I have done.

"Our Murder"

To make this picture I started with a blank canvas specified to the specific page size requirement. Then I used the paint can and painted the background black. This image consists of many different layers. Layers are key. First, I started with a paint brush, in the biggest size I could make it, and then I painted a squiggly line in the bottom left corner. Then, I went to Filter, chose the motion blur button, and chose radical, and changed the specific area to make the curve and lines. Then I wanted a bright colour, so red, and did the exact same thing but did not make the lines so big and spaced out. Next, I made another white line over the circular white layer and used Filter, Wind, and gave it a weird affect to create some sort of fog affect. Then, there was an empty space, so I made a red circle and added a blue line in the middle using paintbrush, and paint can. Then, I went to filter, motion blur again, and used the linear choice. I changed the length and area of the lines to make the circle end up the way it did. I looked at this picture and said to myself that I thought it looked like a reflection in water of the moon, and there was a weird ripple in the water. So, lastly, I added another grey line, Filter, Motion Blur, and blurred the line to make it look like a weird cloud covering the moon.

This picture represents a different time. Everything is disrupted and looks off. The moon is red, and hurt, and there is a secret in the air. This picture is like a murder scene, everything is there, but the little details are always missed. The lines across the moon look like they don't belong, but they really do. There is an eery-ness in the air, or in this case, in the picture, or the reflection on the water. The moon is hiding behind something, but what? This picture is a reflection of someone, we all have secrets and hide behind a lie. What's yours? We change our reflection of ourselves in many ways.

"The Balance"

I created this picture by starting with a canvas size that was "9x11." Then I used the paint can and painted the background black. Then I used a pink gradient and drew a line to make the bigger shaped triangle. Next, I added another layer and added another gradient in a smaller triangle on the right side of the picture. This gradient was blue and it faded into a lighter blue into the right side, and I screened it over the original picture. After adding another layer, I used a yellow/orange gradient in the form of a triangle on the left side of the picture, and dodged it over everything. ( The smaller triangle. ) Next, I used the white paint brush and drew out squiggly lines in the bottom right side of the picture. Then, I used Filter, Motion Blur, Radical, and the squiggly lines turned into a weird circle. This created a light side to the picture, and then the other side I did the exact same thing but with a black paint, and didn't make the lines so big. I think this balanced out the picture well. There is the light side, and dark side to the photo, and each side has a circle that brings you into each side. This could be metaphorical for that our lives are all about choices. There are the choices that bring us into the dark side, and the other choices that can bring us into the light side. It is just a matter of which side you want to be on, and who you want to be. Though, there is the balance of good and evil in this world, and they balance each other out. There can't be one without the other.


- Gorecki

Saturday, October 30, 2010

Beckinsale Graceling


While working on my overlay project and making my face a lion, I was working on my culminating for English. The culminating was we had to read a book and take a character from the book and make an essay on them. I read the book Graceling. Of coarse, I read this book before and absolutely loved it, and there is also a prequel/sequel. You can make it both. A graceling is someone with two different coloured eyes and they have a special talent. This talent could include mind reading, seeing the future, fighting, etc, but no two gracelings are the same. Katsa is special, she has the grace of killing. She has one blue eye and one green eye, and she was the inspiration for me. Due to the fact this isn't a real person, I got inspired while watching the movie Underworld ( I'm a big fantasy freak ) and thought about using Kate Beckinsale. She does a lot of kick-a** movies and I think she would be the person Katsa. Though the age difference might be a little bit of a problem, considering Katsa is supposed to be 18, and Kate Beckinsale is 30-40. Anyways, here is how I made my Katsa.

Firstly, I had to change the eyes, so I took the lasso and drew around the eye, then used a bright blue colour and painted over the area with the paint brush. I changed the eyes by changing their normal, and having it react with the original colour of her eyes. (The button around the opacity) This is how I created her dynamic different coloured eyes. Then, using the burn brush, I shadowed all around her face, making her features more prominent. Then, I used the Enhancing button to change the contrast and brightness of the picture, to also make it more dynamic. After, I found a texture that was cracked and added it to her face but overlaying it. I wanted the scars to look more raw so I took the paintbrush and painted over the lines in red, then overlayed it. I think this gives the picture more of an edge, and shows all her battles she has been through and her strength. Lastly, the blood. That was the trickiest part because I had to make it look somewhat real and not so much painted on. I used different layers and different shades of red and changed the opacity and layer. (Again, using the button around the opacity) I am not so sure about the blood but I think overall I am happy with what I did, in only 10 minutes.

- Gorecki.


Monday, October 25, 2010

Crumbled Lion Face

BEFORE: As you can tell in this picture, my face is obviously photo shopped a bit. What you don't know, is that I took this picture without makeup, and I was sick that day. Also, when you look at the picture, my eye on the left is a copy of my eye on the right. I didn't like the way my eye looked so I changed it, and luckily it worked well and looked rightly placed and real. I used the cloning brush to cover the original eye and eyebrow, then used the largest and highest quality smudge brush that I was able to use, and smudged the skin smoothly together. Afterwards, I blurred everything together to make it not look very choppy. Yes, I know this picture looks off, and that it doesn't look totally realistic, but I don't feel comfortable putting a picture of myself up that looked the way it did before I photo shopped it a bit. I hope you can respect that.


AFTER: It took a lot of effort and small details to concentrate on to make this picture end up the way it did. I had to find pictures of a lion, a henna tattoo, (Yes, I know that part doesn't make sense but I have a weird sense of style. No one really sees henna on a lion) and a picture of high quality bark. I changed the colour of my eyes, from... well whatever colour they are, to a blue colour. To do this, I painted a whole new eye over the existing eye using the paint brush, and used different shades of blue. Then, for the other eye I just copied the blue eye I had already done, and pasted it, and flipped it to fit into the right eye. Then to make it look like it was real-ish, I overlayed it onto my existing eye. Then, I added the henna tattoo. I had to erase the background colour using the paint bucket, and then overlayed it onto my forehead. I do not know why I did this, but this picture kind of reminds me of someone from NARNIA. I wanted to do something different with my face, so I found a picture of bark, and overlayed it on my face as a mask. I had to erase around my face and neck so that they were the only areas of the picture that were "barked." After, using the lion's head, I had to cut around the head using the eraser, and then I transformed it, and sized the picture to it well into my face. I had to burn this picture onto my face. Unfortunately, there was a set back. The face was too orangey and dark to match with the background of the picture, my neck and my hair. So, I found a way to make it work. I went to the Enhancing button, and changed the brightness and contrast. This worked perfectly, and I managed to make it all the same shades and colour. Then, the neck was a bit of a problem. I missed a couple of areas of the neck so I used the lasso and coped and pasted tiny areas into the non-barked areas. Then, to make sure it didn't look so copied and pasted, I blurred and smudged it a bit. I think it worked out well because it brings a bit of depth into the picture. I had some problems with my nose as well. Due to the fact that the lion picture was overlayed, the nose stuck out a bit, so I had to use the smudge brush, and I smudged my nose down and out, to give it more of a lion face, and to match up with the lion nose. I thought my picture was finished but something was still missing. Then I realized, I had a cat on my face but no whiskers. In the end, I used the airbrush in white to brush out whiskers onto my face, which I think was the finishing touch. Hope you find this picture intriguing.
You can think of this picture any way you want it to be, but for me it is that we all have animals inside us that our dying to get out, only, mine is ripping and crumbling to get out. We are all different. Also, if you noticed the lion I used was a male instead of a female. I have nothing against the female lions but I just prefer the male lions. They are fluffier and a lot cuter. :P

- Gorecki.

Friday, October 22, 2010

GORECKI SURREALISM


"The World Around Us"

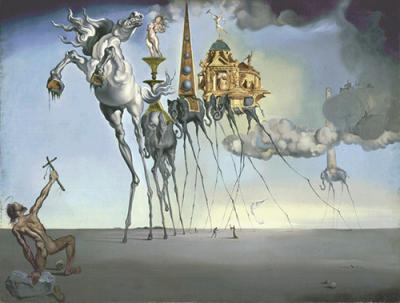
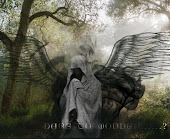
When you read the title of my surrealistic picture, I am guessing you are thinking to yourself, this is NOT the world around ME. This is where you are wrong. We make the world how we want it to be. We see the world how we want to see it, so when you read this title and look at my picture, this is just a small interpretation of what I see in the world around me. So now let me tell you a little bit more about my picture, and why a rabbit is stabbing a nail into a heart, and why an elephant is hatching out of an egg. Let's start with the elephant. The question is always there, what came first, the chicken or the egg? Well, what about elephant? Did they just appear in our world fully grown? Were elephants born from an egg and then populated our world? How did civilizations occur and how did we become known, and how long did it take to have our own thoughts and feelings? As you notice, I am asking a lot more questions than answering them, but that is because our whole life and world is about questions. These questions we will never be able to answer. To make this picture, I had to find a picture of an elephant and an egg and crop them out using lasso tool, and copying and pasting them into my picture. Then I had to change layers and put the elephant in front of the egg. Next, I had to crop around the elephant so it looked like he was actually coming out of the egg. To do this, I took the lasso tool again, and went around the area I needed to delete, and then deleted it. I tweaked around the edges a bit so it would fit better using the eraser. Then using the burn tool, I created a shadow on the ground. Also, to make ti look like the elephant and egg belonged there, I had to change the lighting and contrast using the Enhance button.

Moving on to the rabbit stabbing a nail into the heart. For this I had to find a picture of a bunny standing up, a heart that looked somewhat real, and a nail that would suit the picture. Once I found these, I cropped them out, using the lasso tool, and pasted them and tweaked them a bit as well to make it fit together. Next, I had to add shadows to the pictures to make it look like it was actually happening, so I used the burn tool and put shadows all along the nail, heart, and rabbit's hands. To add a red eye to the rabbit, I made a new layer and tool the paint brush and painted around the eye, and changed the opacity to make it look somewhat real. Let us be realistic here, there is no devil bunny, only ones in Monty Python. Again, with the burn tool, I put shadows on the ground so that it showed they were really there. Then, I burnt around the ground to make it look like the bunny was coming out from the ground to surprise attack on the heart. This is saying that you can't always trust yourself or anyone, you could be stabbed in the back by someone else, even if they look very innocent. Also, you have to live your life day by day cause you never know when it will end. Just have fun with your life and imagination.

Now, the clock in the sky. It obviously represents time, that it is melting away. Sometimes when you aren't paying attention, your life can flash before your eyes. In turn, you lose track of time. We always look at the clock and ask ourselves, when will this be over? What we never do, is look at our position and realize that we have it lucky, and we should cherish every moment we have together. To make this clock, I found a picture of a click I liked, using paint bucket cleared the background away, and melted it by going to filter and liquefy. Then, I just changed it around to make it look interesting, and fitting for the picture.

You can ask yourself, why is there a woman in a wedding dress kneeling on the moon? Well, let me answer that for you. She is the one who had lost someone she loves, she is the one that is lost to the ones that love her. We associate shining stars or the moon, with relatives long past, the ones we miss and hope to see again. When we think of them, we think that they are always looking upon us and they are thinking of us as well. Sometimes, something that is sad is only contentment. Not everything that is lost has to be a bad thing. No one ever looks on the bright side to things anymore. Be optimistic, because no one is ever lost to you forever. To make this lady, I found a picture of her kneeling and lasso-ed around her and cut her out, then pasted her on top of the moon. To make her look like she is fading, and sort of distant, I lowered the opacity, so you can see through her but you do not know what is on her mind. Then, I used a brush tool to make clouds, because I thought this brought everything together and took away the empty space on the picture.

For this project, we had to have a lamp post in our picture. I chose an old lamp post, which I am pretty sure everyone else did as well. They are beautiful in their history, and are our lights to see the world. I found this picture, then took the paint bucket and deleted the white background around it. Next, I made it smaller to fit the screen by transforming it. Then, I placed it in front of the small purple light from the sky in the background. This is just to make it look interesting. Then to create a shadow from the lamp post, I used the burn tool and burnt the ground to make it look shadowed.

Lastly, you see the doorway, opening with a bright shining light on the other side. This is our hope. We go through birth, life, death and a new beginning. (At least this is what some believe.) We have hope that once we die, we go to a happy place, and get away from all the bad, where in the end we will live happily-ever-after. We take the steps to get to where we want to go, and to who we want to be. If someone is hurt, they want an escape from their reality. We can just step through the doorway and find ourselves again, see what we want to see. To create this, I had to find a picture of a doorway that was not copyrighted, and stepping stones that would get smaller and smaller, which would end up leading to the doorway. I took the lasso tool and cut around the doorway frame, and the steps. Then, I cut it out and pasted it to my picture, and sized it so it fit perfectly. I had to transform these images. Next, I coloured the door in with white, with the paint brush, to make it seem like there is a bright light on the other side. After that, I copied one of the doors and placed it to open on the side with the light, this will make it look like the door is opening. Then, I transformed it to make it look like it was actually opened, and not a floating door on the side of the frame. I sized this picture as well. To make the light beams coming out of the doorway, I used a brush and made little light strokes throughout the area with the door. Then, I changed the opacity of them to make it look like actual light beams. I also changed the lighting and contrast of the doorway by using the Enhance button.

The background is what ties this picture together, I found two pictures, one was of the moon and stars, and the other was the pasture. I changed the colour of the grass with the Enhancing button to make it look a bit orange and dead, and I cut it so the trees would fit nicely over the background of the moon and stars. I changed that picture as well, by using the Enhancing button. I just played around with different buttons until I found something that I liked and thought fitted the picture well. I cut around the trees with the pasture picture by using the lasso tool and drawing around it, and fading it by 10px. I hope you enjoyed reading this. Sorry you had to. I can't help myself sometimes. It shows in my writing and my work. :P

- Gorecki.

Thursday, October 14, 2010

NIGHTSHADE (Andrea Cremer) Book Cover Contest

This Contest is Hosted by THE BOOK VIXEN. Contest is open to everyone! Go check it out!
So what do you think? (This is for an out of school activity please ignore this Mrs. Reidel.)

Friday, October 8, 2010

Gorecki Silk Screen

For this task, we were to take a picture of ourselves and turn the picture into an "Andy Warholl Style Silk Screen Effect." I took a picture of me looking away from the camera because I am the type of person who just doesn't want to hear it. I prefer to be off thinking in my own little world and get bored easily. My imagination just goes on forever and and has endless possibilities. While choosing colours for this picture, I started off with one that I really liked at the time; the blue-green colour. Then, while choosing the other colours, I tried to find ones that complimented each other, using a warmer colour and another that went with the cooler colour. I chose bolder colours because I am a bold person. I feel that I am happy with this picture because it just doesn't look very realistic. This just isn't my type of art I enjoy. A problem that I had with this task was to find a picture that had enough shadow to show my facial features and would transition nicely after using the Threshold button. I just had to take a million pictures until I found one that would work and one that I liked. Once I picked a picture, I cropped the background out of it. Then, I used the cloning tool to fix any blemishes I didn't want to see. After finding my colours to use and using the Threshold button, I added all the colours in. I also added another fourth colour to each of the pictures, and that was a lighter colour on my face and neck to show where the light would be hitting me. (Not literally) I used colours that would compliment the whole picture and bring it together. Looking back on this picture, I find it interesting to look at but I am not a professional. I know this picture isn't perfect but I did the best I could in the amount of time I had and I hope you enjoy it.


( IGNORE THIS PLEASE : TO STEPHEN: Hi there this is Jenna Gorecki reporting from the computer in the media arts room. )

- Gorecki.

Friday, October 1, 2010

Advent Posters to Keep Christ In Christmas

Our task was to create an advent poster for the Wellington Catholic District School Board that would be "Keeping Christ in Christmas." To get inspiration for this task, I went over to Church of Our Lady to get some pictures. Unfortunately, after waiting for about an hour, they would not let me into the church. So, while the sun was setting, I decided to take advantage of the situation I was in and get some pictures of the church. We are only supposed to be submitting one poster but I will be submitting three. The pictures were only okay so I decided to photo shop them a bit and change them to make them more interesting to look at.
ADVENT POSTER ONE - THE GLORY OF CHRIST
For this picture, I changed the saturation, brightness, and shadows and hue. Then, I lassoed around the lamb and the doorways and brightened the colour and hue. For this, I used the Enhancing button. Next, I created a box around the bottom the the stairs and changed the opacity so it wasn't very noticeable, and that it all flowed right down the stairs to the quote. The box also changed helps show the quote and makes it readable. Lastly, I changed the little details and took the Wellington School Board logo and using the clear paint bucket, deleted away the background and fitted the logo into the corner. This makes everything look more glorious. This picture is given the feeling that God is always around in plain sight, even when others do not notice. The doors represent that the church is a safe place, and if you want a clean start to your life, it will happen if you have faith. The Lamb over head represents that Christ the Lord is always looking out for everyone, even if it takes a little push, they will find their way through Heaven's Gates. The doorway for eternal happiness. Christmas is a time where we all come together, and celebrate our joy in life. Christmas is not about presents, but what the church and our faith does for us. Love and Faith are the biggest present of all.

ADVENT POSTER TWO - THE GLORY OF GOD
For this picture again, I changed the saturation, brightness, and shadows and hue. The sun beam is all real, and I did nothing to change it. Then I added a border at the top of the poster, colouring it yellow and changing the opacity so that you can see the clouds in the background. Then I added the font, and changed it around a bit and changed colours so that the word Christ was well seen. Lastly, I changed the little details and took the Wellington School Board logo and using the clear paint bucket, deleted away the background and fitted the logo into the corner. I think that this picture shows that God is always in the church, and always in our hearts. God can be found everywhere we look and can even be our inspiration at times when we do not feel like he is around us anymore. God creates beauty, and he creates a hope for us, that we will be with him soon. Even in the hardest of times God will be with us, and will help us through our journeys. Christmas is a time where we all come together, and celebrate our joy in life. Christmas is not about presents, but what the church and our faith does for us. Love and Faith are the biggest present of all.

ADVENT POSTER THREE - THE GLORY OF THE CHURCH
This picture I also changed the saturation, brightness, and shadows and hue with the Enhancing button, along with every other poster I had made. I lassoed around the whole church and made it look more glorious. Then, I added text and changed the shape and size and colour of each of the words so that they fitted together and looked good. Lastly, I changed the little details and took the Wellington School Board logo and using the clear paint bucket, deleted away the background and fitted the logo into the corner. The picture taken looking up shows that the church is a big community and we are all connected. The sky above shows that God brought everyone together, and brought us our favourite things in this world, and he wants us to be happy. One day, we will be with him and be able to watch down on others, and see others who have passed before us. The church is glorious and we will always be together, and it will take a lot to try to tear us down. We stand tall and proud, and we are proud of our faith and our God. Christmas is a time where we all come together, and celebrate our joy in life. Christmas is not about presents, but what the church and our faith does for us. Love and Faith are the biggest present of all.

-Gorecki.

Thursday, September 30, 2010

WHAT IS PERFECT?

Everyone is faced with the same question they ask themselves everyday. What can I do to make myself perfect, or what is perfection? I say that you don't have to look like a supermodel or a model in a magazine because in reality, it is photoshopped and no one really looks like that. So, I decided to take a woman, Megan Fox, who is always talked about because of her beauty. Here is a secret, she has had a lot of plastic surgery aswell and has insecurities problems of her own. I changed her into a woman who is even more plastic than her. Is this true beauty? Take a long look at both of them. Do you envy these women? Why?


- - - - - - - - - BEFORE - - - - - - - - - - - - - - - - - - - - - - - - - - - AFTER - - - - - - - - - -

HOW TO OF HOW I MADE THIS WILL BE POSTED SOON. POST NOT FINISHED!!
- Gorecki.

Monday, September 20, 2010

BLACK AND WHITE PHOTOGRAPHY AT SCHOOL

The imagination sees what it wants to see. Art can be found in anything in our lives everyday. If you look at the school, you may think it is a boring school, but sometimes you can find inspiration in the oddest of places. When you find your inspiration, you change the way it looks and can make it into something completely different.

THE CROSS - Since this is a Catholic school, I decided to add an element of our Christianity into this task. If you take a look of this picture, the first thing you see is Jesus on the cross, but what is so fascinating about this picture? It could actually be a picture taken from up high and the mountains formed this when you change the picture around.

For this picture, you could find inspiration in seeing Jesus on a cross, even if you are not religious, (hopefully no morbid ideas come to mind.) Religion can be a form of art. If you care a lot about it to the point where you can express your love about it, then it is a form of beauty, an art. Art doesn't have to be about something you HAVE to create, you can also appreciate it. Having an appreciation for something is an art.

I created this picture by well going into the chapel and taking a picture of the cross. Then once I got it up on Photo shop, I converted it into Black and white and changed the filter to Note paper, and changed the contrast and shadows on it.


THE CEILING - The element I wanted to show was art. The art room came to mind because well, it is an art room. Again, everyone has their own ideas and imagination and can get inspiration from anything, even another person. So, as you can see in this picture, anyone can have a good idea and make it work, even if it doesn't seem right to one person, it may make sense to a different person.

I had to change the picture to black and white and changed the filter to Note Paper, because I wanted it to match and go together with my picture above. THE CROSS. I had to cut some ceiling tiles and paste them onto blank tiles and areas with lights to make the picture more artsy. Sometimes, the whole ceiling doesn't have to be covered for you to be touched by the artwork. Once I put them over the blank areas, then I used feathering and deleted some parts around the picture so that it would fit in the area better and not look like I photo shopped it. Not all artwork has to look beautiful or pretty. As long as there is someone to acknowledge it, then it doesn't matter. The only thing that matters is if you are happy with your work, and you can have at least one more person appreciate what you have done.

- Gorecki.

Friday, September 17, 2010

Blending Fun

Today, I decided to make a blend. I haven't made one in a while but I hope it is satisfactory. The blend is of Candica Accola from The Vampire Diaries. I was watching the show the other day and I decided that I wanted to make a picture of her. Credit of pictures from Candica-Accola.net. Thank You. I just played around with buttons until I came up with something that I thought was alright. I will probably make another one but for now, enjoy.

- Gorecki.

Thursday, September 16, 2010

FUN

While i was home today, I decided to take a picture off the internet of a girl and change it and make her into a were-girl. The before and afters are there and I have decided to call it "IN THE SHADOWS." Then I put a copyright on my work. Just in case.


To make this picture, I had to add colour to the eyes and mouth while making the rest of the picture black and white. To do this I added layers. Layers are what you need for you to succeed. They really help you keep track of things, and if you screw up, you can always delete them and re do it. I changed the opacity on everything and then added dimensions and created depth. It looks like she is in the shadows. Then, the blood going down her chin, I cut it out from another picture and resized it, then changed the opacity on it. I hope you like the picture. :)


- Gorecki.

Wednesday, September 15, 2010

The New Kid At School Assignment

For this assignment, we were told to take three class pictures from last year, from any three people in our class. Then we had to take different features from those people and make an entirely different person, yet still having the picture look realistic and not like Mr. Potato Head. Something interesting about this picture I created is that this girl looks a bit like my hair dresser. What a weird coincidence. I will name her Jane, after my hair dresser.
BEFORE - - - - - - - - - - - - - - - - - - - - - - - - - - - - - - - - - - - - - - - - - - - - AFTER


This is how I made Jane.

I took Jill's face, erin's mouth, and my eyes and morphed them together. I used the cloning brush and took away Jill's eyes and mouth, leaving her nose intact. Then, to get Erin's mouth and my eyes, I used the lasso and feather and copied them in the picture and pasted them where I wanted them. Then I used the lasso and feathering to blend everything together to make it as seamless as possible. I used other students pictures to cut out the top of the shirt and the school logo by using lasso and cutting them and pasting them onto Jane; then I blended everything together again. Then, using the lasso again, I drew around the hair and changed the colour using the Enhance - Adjust Hue/Saturation tool, changing her hair to strawberry blonde. After, I used the cloning brush to try to cut around the long hair and make it not seem very photo-shopped. Lastly, using the lasso I drew around the eyes and changed the colour using the Enhance - Adjust colour curves tool, changing the colour of her eyes, my eyes, from blue-ish brown, to hazel eyes. I looked over my picture again and touched up a few things I wanted to fix, added a nose piercing and voila! MEET JANE, the newest member to our Our Lady of Lourdes Catholic High School. I hope you find her visually appealing.

I feel like I accomplished what I had set out to do. I think I created a very realistic new person, and I'm very proud of Jane. I hope you like her as much as I like her. :)

- Gorecki.

Thursday, September 9, 2010

MY MR (OR Ms.) POTATO HEAD

We were told to make a potato head person. So I decided to make my person a bit, well different. I personally enjoy making pictures a bit out of the ordinary and fictional. Star Wars is something that is very unexpected.

I secretly, which isn't a secret anymore, used this potato head person to show what I would want to be if I was in a movie like Star Wars. If I could be anyone in a Star Wars movie, it would be a villian; preferably darth vador. Sometimes you wish you could play the bad guy cause you know that if you acted like that in reality, you would be in a lot of trouble.

This person I made has weird looks. She has big features on her face, or around her face. Sometimes weird faces can be very interesting. Also, I wish i had that hair. Why not make a kick-a** amazing person? Though sometimes, reality is better than fiction.

- Gorecki.

Wednesday, September 8, 2010

FIRST CLASS RESPONSES

For this class, I want to be able to learn different techniques at showing my vision of what I see, and to see other people's perspectives; to learn more about them. I love to express myself using art and creating something visual that can make people think and imagine a world outside of their own, a world I see.

We viewed some artwork by Josh Sommers and I think he has a very interesting eye for art.I personally didn't like him drawing himself and the angry stomach; the sunset in the back did not make the picture work. It was interesting but not very visually appealing to me. I did like the tree legs because I thought it was weird and different. How many times will you see someone with stump legs? I enjoy pictures that they take different images and blend them together forming something entirely different and unique. It is more imaginative and gets my attention to visualize a world outside my own. He seems to do that.

"NO GREAT ARTIST EVER SEES THINGS AS THEY REALLY ARE. IF HE DID, HE WOULD CEASE TO BE AN ARTIST." - Oscar Wilde.
I feel that every person sees things differently than they truly are. Everyone is an artist in their own way by how they see something to what they can imagine it to be. Though, this quote can be correct. If someone has no opinion, they are sort of boring, and they can't seem to imagine something that is not always what it seems to be.

- Gorecki.

SCHOOL MEDIA ARTS

This is a new blog i have created to post for my school class *Media Arts. Please refrain from using any of my pictures. And if you do please credit. Thank You Very Much. Hope you enjoy this Mrs. Reidel. :)

( Dali is one of my favourite artists. I hope you enjoy him aswell. I went to see an exhibit of him and his work is amazing. I have one at my house. Alice in Wonderland Collection Piece )


- Gorecki.